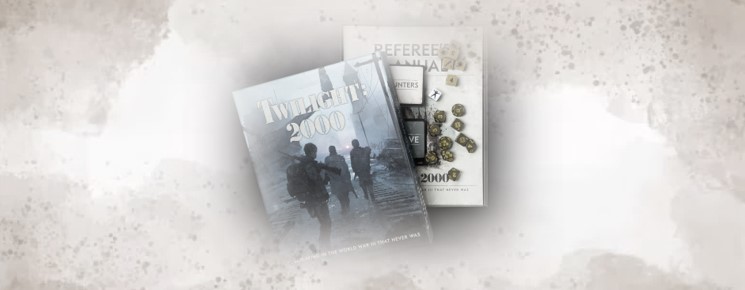
Great! The boxed set contains everything you need to start (role)playing in the World War III that never was. You can read the Player’s Manual, get familiar with the story and the world of Twilight: 2000, understand the mechanics, create your character(s) and you’re good to go.
Or if you are planning on running a group as a referee, you should definitely read the Referee’s Manual (that is, in addition to the Player’s Manual) for a better understanding of the history leading up to the war, the situation at the start of your campaign, the places and the factions. Also, the manual contains a good number of plot hooks, and scenarios with fleshed out NPCs and precarious situations that can reach breaking point should the circumstances – or the players – tip the scale one way or the other.
When everyone around the table knows the rules (the referee especially) and is familiar with the history leading up to WWIII, you can agree on a starting location for your campaign, whether it is the classic Escape from Kalisz scenario (which I recommend for any new group of players), the newly introduced Swedish opening, or any other place deemed more interesting or familiar by your group.
Then it’s game time.

Or there may be another way…
I play my campaign solo, as it suits my somewhat erratic life schedule and allows me to take my time and slow the pace when I feel the narration can benefit from it. After all, my intent is to tell a story.
Playing solo requires you to assume a role that’s in between player and referee, though in my experience more akin to the latter, and after a handful of sessions you get to understand the limitation of your knowledge and what you wish you knew before you started your campaign.
It’s probably a common thread for most new players of any RPG, and having played a single – and solo – campaign doesn’t exactly make me an expert, but I came to envision what I would do if I had players around the table who are new to Twilight: 2000.
Once introduced to the step-dice system, the dice mechanics and the relation between attributes and skills, every player should be able to imagine in which situations skills like Persuasion, First Aid and Driving will come into play. Other skills like Stamina and Survival have a broader spectrum of application, but can easily be introduced and understood the first time they come up.
On the other hand, combat-related skills such as Ranged Combat or Heavy Weapons are intuitive to understand on paper, but require some degree of practice to be fully assimilated. Add the use of Recon, Mobility, Close Combat, Command, types of terrains, the Ammo and Hit Location Dice, and a firefight can become quite a handful.
On the flip-side, a firefight is a great occasion to understand a number of mechanics and skills, and when and how to apply them as your PC battles the dangers of T2K.
So why not start with a firefight?
At this point your players are green, and probably don’t want to risk their brand-new characters they just spent time and effort creating by tossing them into a firefight without an acceptable knowledge of the mechanics at play. It’s one thing to know the odds, it’s another to stack them in your favor.
Get each of your players an expandable character, ideally using the archetypes provided in the Player’s Manual, so to have some variety. They don’t have to be fully finished, all you need is attributes and skills’ levels, hit and stress points, CUF, unit morale and their equipment. Distribute them randomly, or ask the players which one they feel is closer to the character they intend to create. And stress out that these are temporary, random character and their actual campaign PCs will be created later.
Put your expandable PCs in a defensive position using the battle maps in the boxed set and throw at them a variegated and escalating enemy force. Have the enemy attack them form different directions, in varying numbers, with single units and groups (managing multiples bad guys is a good exercise for the Referee as well, and allows you to introduce and practice the simplified rules for NPCs if you want to). The goal is not to overwhelm the PCs, rather to keep them engaged. Have some rounds of respite every now and then, and make sure they have to change position to get line of sight or so that they are in cover.
I can hear you: you want some more guidance.
Exempli gratia: I have 4 players, all new to T2K, and at this point I’ll assume we have discussed the game and we are familiar with its core concept: it’s roleplaying in a hypothetical WWIII (so hopefully nobody expects to fight zombies using magic…).
After having illustrated the attributes and skills, hit and stress points, and having shown the basic dice mechanics for using a skill (including pushing a roll), I proceed with a brief overview of the archetypes and end with a question: which of these characters is closest to the PC you’d like to play with?
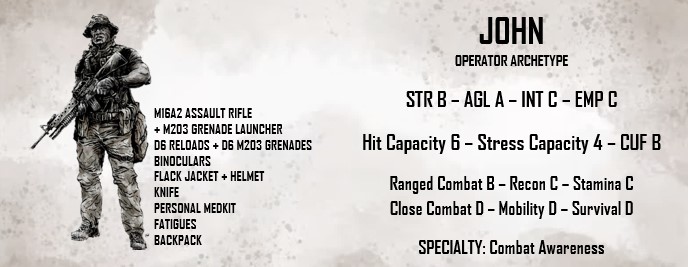
- JOHN is interested in roleplaying as a badass spec ops soldier, a modern-day warrior. He therefore picks the character created using the Operator archetype.
- PAUL takes one look at Niklas Brandt’s illustration of the Medic archetype and he is hooked. He thinks it looks like Mads Mikkelsen, and apparently that’s enough.
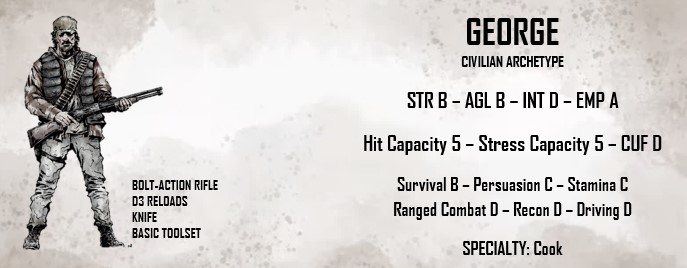
- GEORGE would like to play as a fish-out-of-water character; someone forced to adapt and survive by the war. He considers both the Kid and the Civilian archetypes, and settles for the latter.
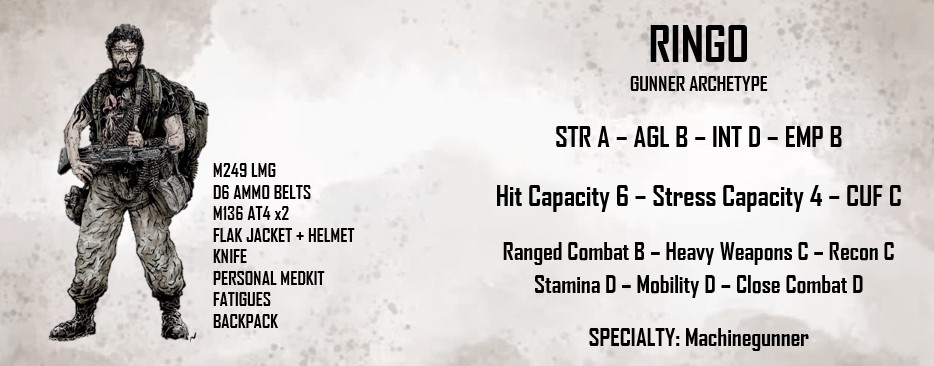
- RINGO has no interest in leading, rather wants to be someone the others can rely upon. Also, he thinks the group could use a bit more firepower. His choice is the Gunner archetype.
Of course, these are temporary PCs. I’ll later guide everyone through the Life Path process for creating a character, and they’ll be able to flesh out their ink-and-paper counterparts, putting their personal touch on every choice and ability, either going for something similar to the archetype they have picked now, or something completely different.
Character creation through the archetype is detailed on page 20 of the Player’s Manual; for our purposes, the players only need to go through steps 5, 6, 7, 8, 9, 10 and 17. You can either prepare a character for each archetype ahead of time, or go through the process with each player at the table; my advice is for the former option, as there will be time to go through the many possibilities when doing the actual character creation later (these are temporary characters: you don’t want your players to browse all specialties and go through every item in the gears section). Also, having multiple characters ready can be useful should one player die early on in this practice scenario (dice have their ways…); you can quickly have him re-enter the fight with a different character – or the same, after all this is meant to illustrate the game’s mechanics for a firefight.
Here are the characters for my hypothetical players:

Now it’s time to break out the battle maps and combat tokens from the T2K Boxed Set. I’ll pick the map below, as it looks like a good position to defend, with both open terrain and vegetation for the bad guys to attack from.
Blue tokens are usually reserved for players and allied forces, red for the main enemy forces (Russians), yellow is for other organized factions (think Sheperd’s Flock and the like), and sand-colored tokens are for marauders and armed civilians. You can of course tweak and change these assignations as you see fit.
For the sake of clarity, I placed custom tokens to represent my four players. I then introduce and illustrate the concept of full and partial cover, and let them take their final positions as they see fit. Below is the result.

Time for combat: we’ll start easy with single, lightly-armed enemies. A few approaching from the open area to the N-W, and one or two trying to exploit the vegetation to their advantage (at this stage I want the players to see flanking enemies, so they’ll start in the open and then go for the vegetation).
Stats and equipment for the enemies can be easily found on the table of typical NPCs on page 37 of the Referee’s Manual. For these first enemies (and for all yellow tokens) I’m going with typical marauders.
For the initiative order, I can either proceed with an opposite Recon roll, or assign initiative by drawing cards.
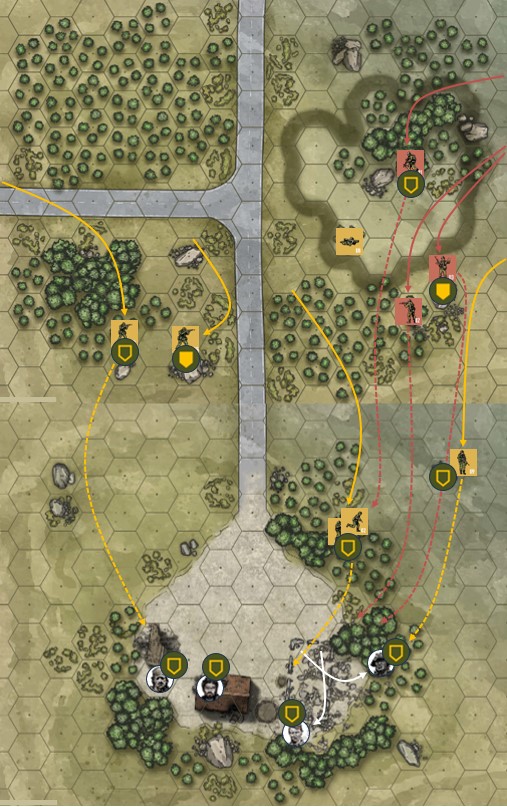
On the updated map below, you can see the enemies represented by yellow tokens: the continuous lines show the movement they have already made at the point in time depicted on the map, and the dotted lines their projected movement for the next rounds.

Some of them have (smartly) taken cover, others are (stupidly) out in the open, and one is going for a (too) long flanking movement. There’s a good chance some of them will be gunned down by the players in the early rounds, so this is map is just to give an idea for a first attack.
Also, GEORGE has correctly read the situation and has decided to move outside the partially collapsed house and take cover behind its still intact southern wall, placing the building in between himself and the approaching enemies (he has no flack jacket or helmet, so he better play it on the safe side).
Let’s imagine that ENEMIES 1 and 2 are easily killed in the first couple of rounds, likely by RINGO, and that a lucky roll by JOHN kills ENEMY 4 in the opening round. I’ll throw in a few more enemies in round 3 just to keep things interesting.

The new entries are charging right in the open area in the middle of the map, and RINGO should have no problem mowing them down with his M249. JOHN is also in a good position to pick targets while maintaining cover. On the left side, GEORGE is facing ENEMY 3 1vs1, but the latter is planning to move towards the central part of the map, exposing himself to fire from JOHN.
Also, good thing PAUL remembered about ENEMY 5 flanking movement, and has shifted position, ready to intercept him.
In conclusion, this group of assailants should be easily dealt with, and that’s by design. I imagine them spraying bullets with every attack, with frequent need for reloading until they eventually run out of ammo entirely. In this case, they can either charge with a knife, or flee the battle altogether.
Now, depending on the players’ conditions, I can give them a few rounds of respite to reload, patch themselves up and perhaps acquire some weapons from fallen enemies, or I can jump straight ahead to the next assault, perhaps by telling them they see more movement far ahead.
How far? They ask. Let’s broaden the horizon.

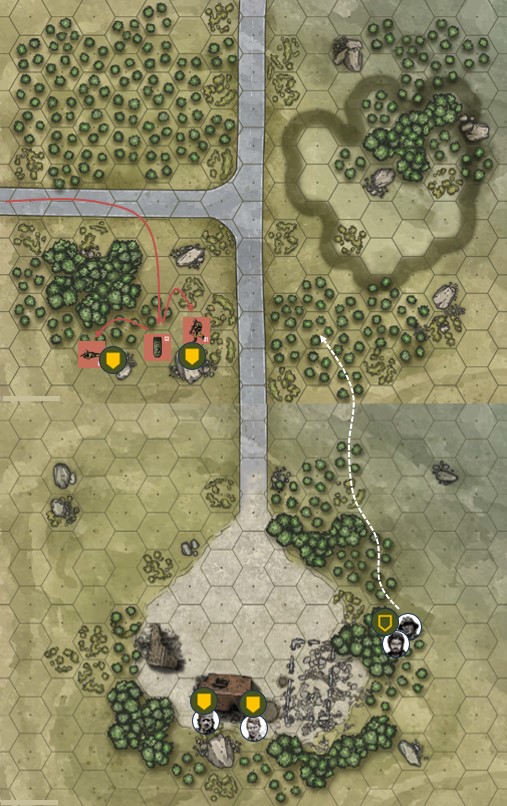
Now we have a good opportunity to see how effective fire is at longer ranges, and whether it’s best to let enemies approach you, or engage them as soon as you spot them.
Enemies will have to traverse more terrain on order to get to (at least) medium range, but there’s good cover to exploit for the initial part of the approach.
For variety’s sake, I’ll introduce the concept of groups of NPCs by grouping 2-3 enemies, while keeping the others as single units.

Here’s another little variation: not all enemies will assault the players’ position. The group composed of ENEMIES 4 and 5 will go for cover and keep firing on the players from it, and ENEMY 8 will exploit the higher terrain by going prone and firing from a distance.
PAUL, who started the fight with only a pistol, has recovered an AK from one of the enemies in the first assault. He only has Ranged Combat D though, so he’ll wait for the enemies to get closer before opening fire. Also, he has changed position to better face the incoming threat.
After they have dealt with the assaulting force, the players may even think about attacking back the remaining shooters, something I’ll discourage by throwing more enemies into the fight. Of course everything will be decided depending on how combat evolves.
Let’s imagine after a few rounds some of the enemies have been dealt with, and that I have thrown in some more. It’s a good time to introduce some Soviet soldiers, with better stats and equipment, and play them as less prone to get caught in the open.
I am now exceeding the number of initiative cards (10) and increasing bookkeeping for myself as the Referee by adding more units, which is not ideal. I’m assuming enemy marauders (in yellow) will be easily dealt with, or retreat if they’re out of ammo (once more: always adjust the challenge depending on the situation).
Once the assault has been repelled, I can give my players a brief respite, and tell them they find a crate in the main building with an AT weapon (probably an RPG for variety), some ammo and grenades, and a flack jacket (GEORGE doesn’t have one).
If the players are up for it, then I’ll launch one more assault at their position. Time to add another battle map.

This forces the party to split and face attack on two sides. Ideally some of the enemies will manage to get to melee distance and engage in hand-to-hand combat with one of the players. If they are killed on approach, consider the possibility of introducing a single new enemy coming from the sides of the central map and moving unnoticed towards the group, sneaking up on one of the players. It’s a bit like cheating, especially if you don’t have the players even roll for Recon, but it’s all in the interest of practicing combat in T2K.
I’ll throw enemies at the players as I see fit, until I eventually send in an enemy vehicle, like a BTR-60 with a couple hundred rounds for its KPV heavy machinegun. The idea is to have the BTR suppress half the group, while giving the other half a route to flank it and attack it. This should force the players to go on the offensive for a change. Depending on the circumstances, I may give my players a few smoke grenades at this point.
In this scenario, GEORGE and PAUL can benefit from throwing smoke grenades to break the BTR line of sight, and JOHN and RINGO can use smoke to cover their movement in the open terrain ahead. Although throwing smoke could force the BTR to move…
If your players are wounded or not up to fighting an armored vehicle for any other reason, consider bringing in a mortar, have a couple rounds land in the vicinities of the group, have the players locate the spotter and then assault the mortar crew. The enemies will still be all infantry, but – again – you’re forcing the players to move.
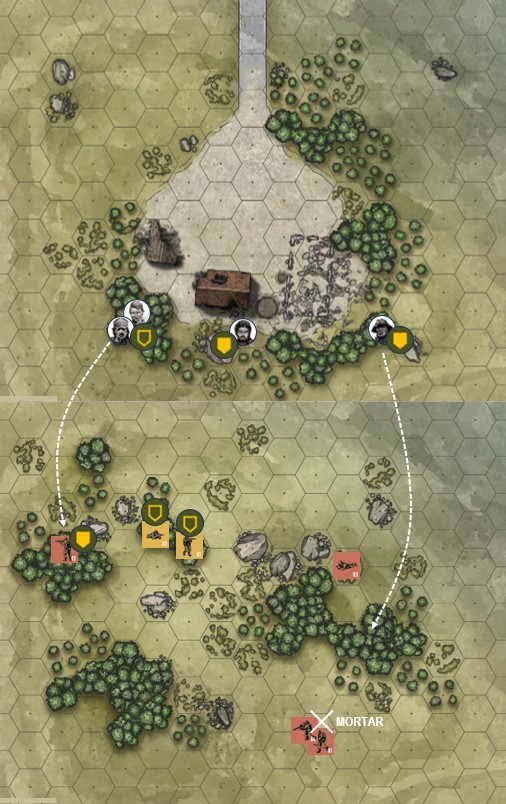
In this scenario the mortar is unrealistically close to the players, but that’s not the point. Also, there’s no official token for a mortar, so you’ll have to improvise something.
You can up the challenge one notch by having mortars fall at regular intervals (maybe one shell every other round), getting incrementally closer to the players’ position.
IN CONCLUSION
This is meant to be an introductory scenario to T2K 4th Edition, and hopefully it will accomplish just that for your players. Showcase the most dice-intensive part of the game, and have them practice in a safe environment where mistakes are opportunities to learn from.
Of course you can (and should) tweak and adjust these scenarios as you see fit, increasing or reducing the assailants as the circumstances demand. After all, the idea is to challenge the players, not to overwhelm them.
Ideally, as the Referee you want to keep these principles in mind:
- Get some variety: in enemies, weapons, tactics, ranges, elevations
- Make sure you touch at least once on Ranged Combat, Heavy Weapons, Partial and Full Cover, Reloading, Grouped NPCs, Throwing Grenades, Explosions, Close Combat, Recon and Suppression
- Remind your players that going prone is a free action (and a penalty to enemies’ rolls)
- Have your players make the link between attributes and skill, and then apply all relevant modifiers to understand which dice they will roll in the end
- Optimize players’ rolls: have your players roll all dice at once (base dice, ammo dice and hit location die). This is especially useful in keeping turns quick
- Remind your players that they can push rolls, and how to
Once this introductory scenario is over, you can proceed with character creation, and finalize the group your players will bring in the World War III that never was.
RESOURCES
I have published a few pages of Resources for T2K 4th Edition, that you can use as reference before and during play.
If your group wants to brush up on the Dice Mechanics of Twilight: 2000 in its 4th iteration, you may want to check the following page.

Has your group gone through the introductory scenario? Then it’s time to create your characters for the campaign. If you are interested in the Life Path method, you may want to check the following page.

And finally, in playing my solo campaign I have put my characters to the test in multiple (fire)fights. As a result, I have compiled a list of best practises for managing combat in Twilight: 2000 4th Edition. You can find it on the following page.

Or if you want to get the full story, you can jump to the start of this Twilight: 2000 Solo Campaign by pressing the button below.